

Want to make a woolie pentagon box for your sewing notions?
This is a Dodecahedron.
(don't say that with a mouthful of popcorn!)
12 pentagons, 30 edges, and 20 vertices (points)!
You will need:
Lightweight cardboard,
cut 12 cardboard pentagon shapes.
Cotton quilt batt scraps cut to the same size as cardboard,
please cut 13 pentagons, the extra will be for the inside of the lid.
Lightweight mismatched felted wools for the faces,
cut 12 pentagons, 1/4 to 1/2 inch larger than the cardboard.
Lightweight wool or flannel of one colour to use as lining,
cut 12 pentagons, 1/4 to 1/2 inch larger than the cardboard.
(Check my Etsy Shop...from time to time
I will have templates and kits listed)
(Check my Etsy Shop...from time to time
I will have templates and kits listed)

This is my favourite quick method for fusing the layers,
Cut pieces of fusible hem tape to the length of a side.
Now trim that piece in half lengthwise.

Layer the batting between the cardboard and wool fabric.
Carefully place trimmed fusing tape on cardboard, fold over the wool fabric and iron. Repeat on all 5 sides.

Trim the corners

Press again

Now press a hem on the lining pieces.
Use the cardboard as a template, work around all sides

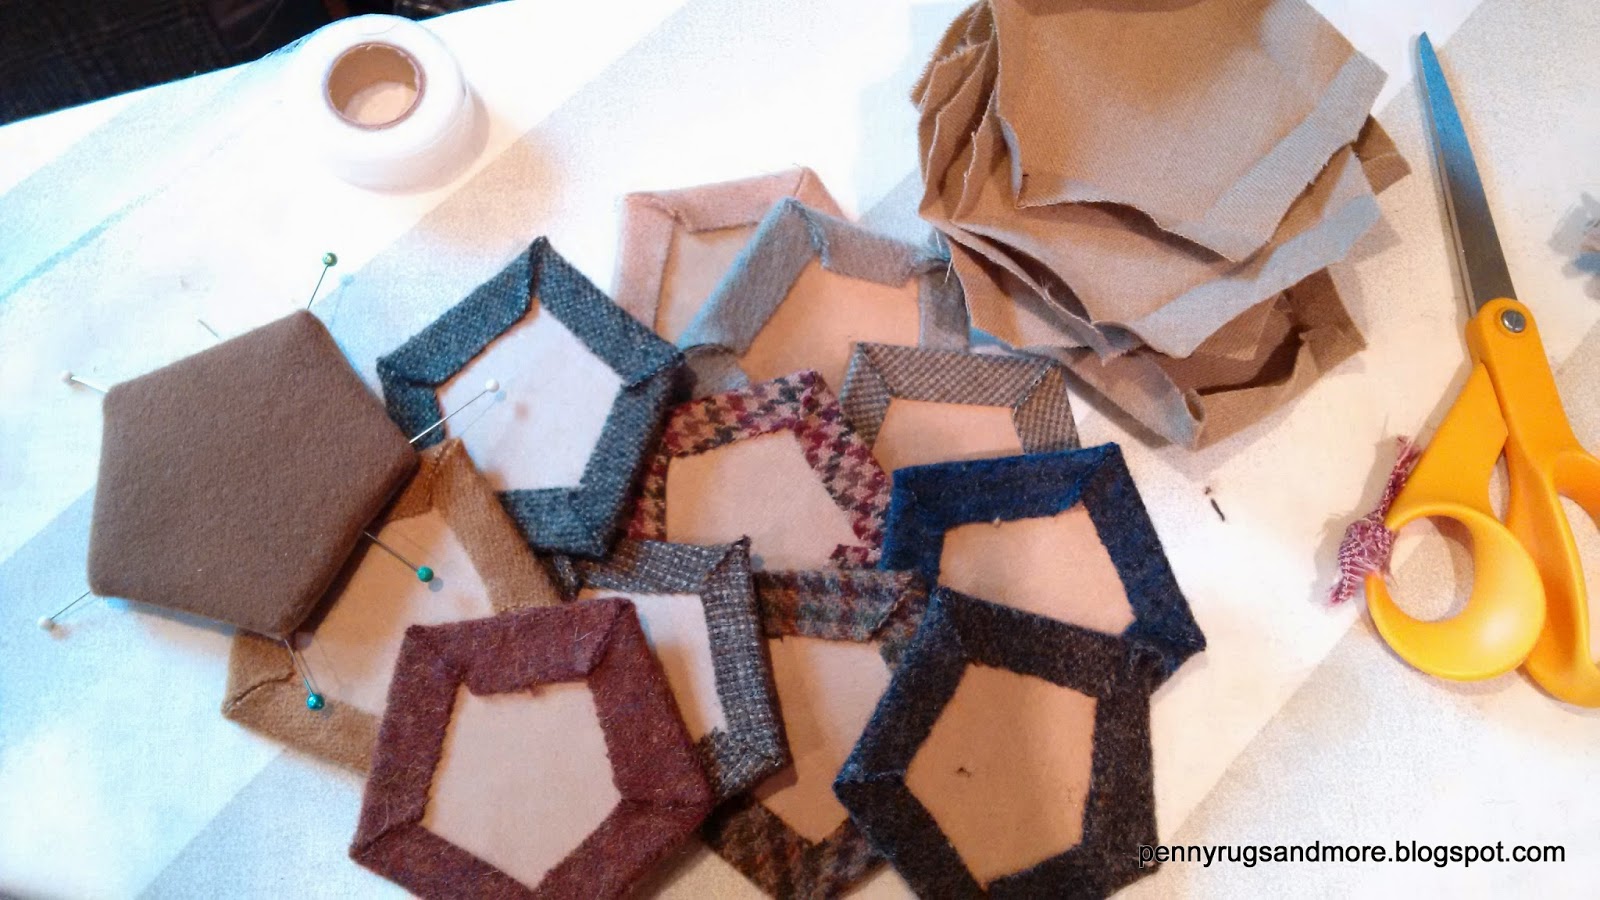
Here are 12 covered and batted pieces with 12 liners ready to stitch.
To reduce bulk, trim away the corners on the lining.
Be careful not to trim past the ironed hem.
Leave just a smidge for stitching.

Pin lining to the cardboard side of the wool and batt pieces.

Use a neutral coloured thread and
make small whip stitches to join the sides.
I used Coates and Clark polyester, brown #8360.
***Stop here and decide which shape will be the lid, use the extra, or 13th piece of batting for the lining side of the cardboard***

Lay out the finished pieces
I chose the red piece to be my lid.
It has batting on both sides of the cardboard.

Join each side with small whip stitches.
Stitch on the right side of the pentagons.

Six pieces joined, place right sides down.

Now bring up the sides and stitch one side at a time.


(Stop now if you want a bowl!)

Add a row around the bowl

Keep going all the way around the bowl, using 5 more shapes.

The last shape is your lid.
This is the piece that has batting on both sides.
The perfect spot to hold needles and pins!

Not finished yet.
Time to personalize and pretty it up a bit.
Work a feather stitch,
which is an adaption of a blanket stitch,
along all the edges.
Embroider with one colour, or a combination of thread colours.


Add a fob to hold the lid down.
I used a bobbin, a woolie strawberry, and a button!
You could use one, or all, or any weighty dangle thing of your choice.

What will you keep in your
Dodecahedron?
Dodecahedron?


I will be making wool pieced kits for this project, no thread.
I'm playing with the shapes to get just the right sized opening.
Let me know if you are interested.
STunning!
ReplyDeleteWonderful piece and wonderful tutorial.
ReplyDeleteDebbie
I have made these little boxes but it was several years ago. Now I am going to have to make a few more after seeing your wonderful box!
ReplyDeleteI am interested in what measurement you found to work for a side of the template?
ReplyDeleteHi Melva, the sizes vary and are tricky to measure. Draw a pentagon the size that will be a good opening and will hold a few needles.
DeleteHi Melva, I'm still playing with the size, the biggest one is about 5 inches across depending on how you measure a pentagon. You will need to decide on the size of opening you desire, that will be your cardboard and batting size. If you will be keeping needles, make sure they will fit inside the lid. I will be selling templates for this project when I get the sizes that I like confirmed. They will be in my Etsy shop in February 2015.
ReplyDeleteGreat job on the tutorial and what a sweet little box my dear friend!
ReplyDeleteFeather stitching is just perfect! A great little place to store those templates I keep losing.. the only thing that would be more perfect, is more penny rug making??
Your rugs are always very special and unique as are you!
Hi Cee, great idea, template keeper! Yes, more rugs to come!
DeleteColleen, I love the little box! Definitely want to try and make one. I will keep a look out for the templates when you have them listed.
ReplyDeleteI love it, thank you for sharing the tutorial!
ReplyDeleteI am definetely interested in a kit for the box - I am new to wool stitching and while I have been collecting wool for years have yet to make my first penny rug. I have been following your blog and love your turorials. Thanks for all the good info.
ReplyDeleteDelania, I've now listed some kits and some templates for two sizes, 5" finished and 6" finished. Please check my Etsy Shop
DeleteThanks! Made one several years ago and lost my pattern. I use it to keep rug hooking supplies together !
ReplyDeleteHow exciting I would like to make one!
ReplyDeleteHi Susan, thanks so much. If you'd like templates or a kit, check my Etsy shop. I'm happy to do a custom order if my shop listing is expired or out.
DeleteHi Colleen, I would absolute {{love}} to make one of these. I just sent you a message thru your Etsy convo on Mar. 9th. Look forward to hearing from you when you get a free minute. Thanks so much ♥ -- Diane
ReplyDeleteHi Diane, thanks for the request. Check your inbox. I'm happy to fill any orders.
DeleteHow wonderful. Your tutorial is fantastic!!! Thank you :)
ReplyDeleteHello, thank you for sharing! It's awesome!
ReplyDeleteI'm posting a link to the tutorial on a French Quilters forum, giving you credit, of course. I hope that's OK with you.
Beatrice, thank you very much for letting me that you like my tutorial and you are going to share my link! That's wonderful and perfectly okay with me. I hope the quilting group has fun with the project. I'm currently trying a teeny size just for fun....may be nice for Christmas ornaments?
DeleteThis is charming! Thanks so much for the excellent tutorial; looking forward to making one.
ReplyDeleteBeautiful pattern instructions, wondering what kind of thread is used for the feather stitch final touch?
ReplyDeleteI used something from my stash that was similar to #10 crochet cotton which is my favourite thread for penny rug projects. You could use embroidery cotton or similar. Play around d with the thickness to get it to look the way you'd like. Always step back to see the result and effect. Have fun!
DeleteThis is GENIUS!!!
ReplyDeleteThank you so much for sharing!
XO
Charming! I have made square ones (years ago). This looks delightfully challenging! Happy New Year to all.
ReplyDelete