
 We escaped to the lake for a couple days and I found some time to stitch!
Here's the needlepoint clutch tutorial.
I left a few things behind in my studio; but I worked it out for you.
To begin with you will need a piece of fabric 9 inches wide and about 48" to 60" long.
I used a selvedge to selvedge length.
Adjust your pockets to your likeness based on your available length of fabric.
Use a medium weight fabric, not too light, not too heavy.
For this lesson I used a lightweight piece of suiting yardage.
I found it at the thrift store.
I pre washed it and brought along at piece of felted wool for trim.
I found a nice matching coat button in one of my jars of buttons read: thrift finds.
 Remember to always use a pressing cloth when pressing wool.
Otherwise, you will have a shiny finished product.
I forgot my pressing cloth at home, a cotton tea towel is substituted.
 I trimmed off the selvedge and folded about 1/4 to 1/2" and pressed.
 Then fold again about 1 inch to 1 1/4".
 Press well.
 Now topstitch the fold.
 This is an illustration of the width of my fabric.
(I love old yardsticks)
 I'm making these pockets 5 1/4". Fold yours at a depth you like and press well.
 Now repeat the folds, in a fan fold method and press each one.
 Count your folds and check to see how many pockets you are creating.
 I am making 4 pockets.
 Remember you need a flap, so that will be folded over from the back to the front.
 Measure beyond the folds 1 1/2" to 2" to allow for the finishing of the flap.
Cut off the excess.
 Repeat the 1/4" to 1/2" fold and a second fold again at about 1 - 1 1/2"
Press well and top stitch in place.
 Pin the sides well and stitch.
 Here are the pocket folds after being sewn at the sides.
 Measure and cut a 1 1/2" wide strip of felted wool; the length of your open clutch.
 This strip will be hand blanket stitched on one side.
Folded lengthwise, then stitched on the other side of the strip to your clutch.
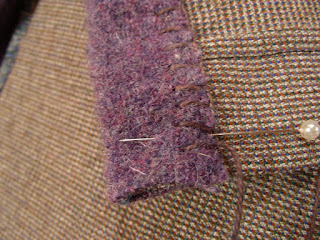
 Begin blanket stitching. I always wrap the needle
 of my first stitch so that it stands at attention.

Work your blanket stitches along one side of your clutch.
 This is me doing a corner.
  Stitch into the same spot and take the stitch diagonally to the corner.
 This is me doing a corner.
 (I aplolgize for the dark thread, I forgot my light colours at home.)
At this point you should fold the other side of the felted wool
and make sure your next stitches catch both sides.
You will have a 3/4 inch felted border that covers
the raw edges of the sides of your clutch.
 Stitch into the same spot and take the stitch diagonally to the corner.
 You will need to make a small stitch at this corner to hold it in place.
 Then stitch again into the same blanket stitch.
 Then stitch again into the same blanket stitch.
 (three stitches coming from the same point)
 Continue to the end. Again, be sure your are catching the folded felted wool on both sides.
 From the fold, pass the needle to the corner (inside to hide the thread)
 Continue to the end. Again, be sure your are catching the folded felted wool on both sides.
 From the fold, pass the needle to the corner (inside to hide the thread)
and begin stitching in the other direction of the folded felt strip.

 Now, the second side (of the same side) of your clutch.
 Getting to that corner again on the first side of the second side of my clutch.


 This is when my batteries decided to fail.
 I like to place the button in the upper part of the hole,

 Now, the second side (of the same side) of your clutch.
 Getting to that corner again on the first side of the second side of my clutch.


 This is when my batteries decided to fail.
While Neil was off getting me another set,
I cut a 5" by 2" length of wool and folded it
at the middle of the flap to create a nice finish for my button.
After you have stitched this in place,
creating a 2" x 2 1/2" applique on each side of the flap,
cut a hole (very carefully) to accomodate your button.
Blanket, or buttonhole stitch, around your buttonhole.
Fold your clutch and place a pin at the position for your button.
 I like to place the button in the upper part of the hole,
to allow for lots of movement for a full clutch.
 Open the clutch and sew on a button. I like to use a button with a shank and reinforce it with another button on the inside. No rules for size, I forgot to bring a small flat button with two holes, so I made do with a larger button with four holes.


 Four pouch needlepoint sewing clutch, done!
 Open the clutch and sew on a button. I like to use a button with a shank and reinforce it with another button on the inside. No rules for size, I forgot to bring a small flat button with two holes, so I made do with a larger button with four holes.

 Four pouch needlepoint sewing clutch, done!
 Should I auction this on eBay, with maybe some teeny tiny pennies inside?
Click here to see another example.
Colleen, Hi!! I am going through my links to add you to my new photo blog and the treat is I Have been visiting all my wool friends. I miss you all.
ReplyDeleteMy your blog is amazing and your tutorials so thorough.
Hugs,
Arleen
Colleen,
ReplyDeleteHappy Birthday Girl!!
I hope that you dont mind but I linked your tutorial on my blog, its terrific. You amaze me, you really do.
Have a great day today,
Wooly hugs,
Trudy
The tutorial is so neat I love it and I also love the old yardsticks so far I only have one it was my dad's:)
ReplyDeleteRondell
Thank you so much for sharing your tutorials with all of us. I really love your designs. You are very talented and it is kind of you to share. Your instructions are always very easy to understand.
ReplyDelete