
My Penny Purse Tutorial
 As promised, my penny purse tutorial. It would be my pleasure that you could make these from your wooly scraps, for your friends and family. Please, no mass productions without my approval. And, it would be so kind if you would pass on my blog as the site where you learned to make these adorable little purses. I'd love to see pictures of your completed penny purse.
 Send me your comments too!
Recycle your reclaimed wool and reclaimed zippers. (This is an excellent project for all that reclaimed wool with difficult to remove interfacing)
For ease of construction, use a zipper about 8 inches (20 cm) long; a shorter zipper length is more challenging to apply.
Please read all the instructions first. I cannot guarantee how your penny purse will turn out. Have fun, that's important. I have pre-felted my wool. I use 80% to 100% woven wools, sometimes I use knits, though, they can felt up quite thick.
It's all experiment and experience.
How to felt wool? Hot wash, cold rinse, hot dryer.
How to felt wool? Hot wash, cold rinse, hot dryer.
(Take care of your finished piece with careful cleaning)
This action opens the scales in the wool and binds them together.
This action opens the scales in the wool and binds them together.

Cut the wool and a lining fabric (24.5cm) 9 1/2" long and (10 cm) 4" wide. Mark down (1 cm) 1/4" at the top for placement of the zipper. Mark down (9.5 cm) 3 3/4" for the fold. Mark another (1 cm) 1/4" from the other end for the zipper placement and again (2.5cm) 1" from that same end, for the second fold.
Stitch your penny stacks, then place and stitch them onto your wool. Place the pennies in the area between the seams and above the fold. I used 1 inch and 1/2 inch pennies for this project. There are no rules; use whatever applique you can fit onto your purse.
Stitch your penny stacks, then place and stitch them onto your wool. Place the pennies in the area between the seams and above the fold. I used 1 inch and 1/2 inch pennies for this project. There are no rules; use whatever applique you can fit onto your purse.


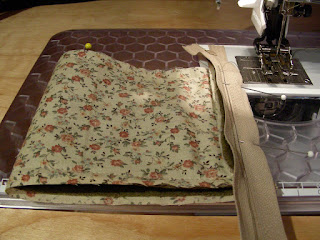
 Place the outside edge of the zipper, right sides together,
matching the edge of your lined purse fabric.

Bring the other end of the purse fabric up and sew the closed zipper to the other end.


 Open the zipper to the stop and top stitch the folds in place.


Now, make sure that the sides of the purse are lined up.
Turn your purse inside out.
Fold the purse at the 1" (2.5 cm) pin and the 3 3/4" (9.5 cm) pin.
 Cut a piece of thonging or strong cord. This will be tucked inside, above the zipper. Pin well, when the seam is stitched, the loop will be attached.
 Match the cut ends of the thong/cord to the edge of the inside of the purse and pin well.
 I also add my "handmade by me", Rag-a-Muffin Collectibles tag at this point. The seam stitching will catch it. Leave the zipper half way open. (very important, or you will have lots of fun turning the purse right side out) Pin well, line up the open end of the zipper so that, when finished, it will close nicely.
 Stitch side seams, about 1/4". (1 cm)
 Especially go over twice or more at the thonging and the zipper ends.
 Overcast with a zig zag stitch to protect the raw edges.
 Fun part, trim everything.
Challenge part...unzip and turn, use a blunt ended tool to push out the corners and seams.
 Use the steam setting of your iron, cover your purse with a pressing cloth or towel and give it a shot of steam. Now, don't forget to add a split right to the cord. This is great for a key or, add a clip to the split ring. You could clip your tiny purse to your belt loop.
This is a perfect little purse for days when you don't want to take your whole bag along. This will hold a credit card, driver's license, some folded money and coins. Or, how about using it for your ipod or small cell phone? This finished item is approximatley 3 1/2" x 4 1/2", depending on the thickness of the fabrics used and the width of your seam allowances.
Check my penny purses for purchase on Etsy.
It is helpful to have some zipper experience.If you are using a reclaimed zipper, be sure it has "stops" at both ends. If not, take the time to sew across the ends and create "stops".
After you have stitched the penny stacks in place, you can baste the lining fabric to the outer wool fabric. WRONG sides together and see, your penny stack stitching doesn't show!
These are absolutely adorable! I just love how cute they are! I may just have to buy some wool to try and make one!
ReplyDeleteColleen,
ReplyDeleteWhat a great tutorial on the penny purses! I still don't know if I am up to making one; I suck at sewing and zippers. When things settle down here I an going to read and look at the pic's again and attempt it.
Wonderful job:)
Saying a prayer for your Mom as well, I hope that she recovers soon.
Trudy
What a wonderful tutorial -I am a "newbie" to the wool applique and such - your tuturial has given me the courage to give it a try! Thank you for posting this.
ReplyDeleteDawn
Hi Colleen, I received my penny purses and I can't believe how adorable they are up close and personal. Thank you for the tiny, delightful surprise inside. I can't wait to share one with my sister. You have truly made my day!
ReplyDeleteHey Colleen...The tutorial is GREAT! I know I could make one, but ended up buying one from you. Adorable and just perfect for my
ReplyDeletemp3 player! Keep up the great work!
colleen, your tutorials are truly the best! i love these penny purses.
ReplyDeletehugs,
arleen oliver
Wonderful tutorial! I can't wait to make one! Thanks!
ReplyDeleteNice! I'm going to put this project on my to do list!
ReplyDeleteHow Cute! I love them and a big thank you for the tutorial! I will definitely try making at least one!
ReplyDeleteReally well explained tutorial and I love the purse, the colours and everything about it. Thanks
ReplyDeleteHi Just dropped by to say Hello and see how to make a Penny Purse having just completed a quilted tote bag from http://www.psiquilt.com/2009/08/friendship-bag-tutorial.html.
ReplyDeleteI thought a Penny Purse would be just the thing so thanks for your help.
this is definitely my next sewing project for my class. Thanks a million. Great article
ReplyDeleteCotton Tapestries