
They're back! I've made some more cutting templates!
Check out my etsy shop or,
my Paypal Widget Storefront on the side bar of this blog.
Here I will teach you how to cut wool pennies for your next penny rug project.
Remember, you can use any circular object for a template.
i.e., pennies or coins (that's why they are called penny rugs),
buttons, bottle caps...anything round and of the desired size.

These are really good templates,
in graduated sizes from 3" to 3/4 of an inch,
for marking and cutting out circles for penny rugs.

I can recommend freezer paper from the grocery store for tracing and cutting fabrics into shapes. Prepare your wool. Warm wash, cold rinse, hot dryer. This action will open the scales in the wool and once opened they will bind together into a new formation, creating a new fabric. Fulled or felted, also known as boiled wool. I use woven fabrics, recycled skirts, blazers, slacks, blankets and the like. It's not uncommon to use knitted garments for penny rugs, although they can become a bit too thick to work with. If your first wash cycle doesn't produce the result you want, wash in hotter water. Not all wool will felt, such as factory treated super wash wool, some will felt more than others,
so start with warm water.
so start with warm water.
Lightly press your fabric first with a pressing cloth covering the wool. If you don't cover the cloth, your iron will create a permanent sheen on your wool. Press the freezer paper SHINY side down onto your wool. Press for a few good seconds, pressing the entire square of paper.
(Again, use a pressing cloth if the iron extends beyond your piece of freezer paper.)


Next cut the circles into strips.

Then cut into individual pieces.

Carefully cut around the paper and the fabric.

Voila! Remove the paper from the circle.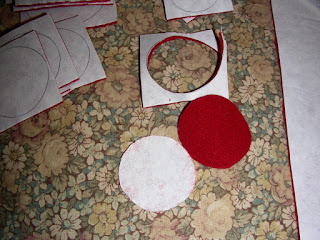 Another method, skip the freezer paper,
Another method, skip the freezer paper,
just hold the template directly against the fabric, cutting around it.


There you go; another perfect circle, ready to stitch!
great tips!! i am loving the templates.
ReplyDeleteGreat tutorial Colleen, I love your templates and I don't think I could make my rugs without them. They are so much easier than the freezer paper method plus for good primitive style rugs you need 'not so perfect' circles'. I can do this with your templates although I find myself cutting more 'perfect' circles than primitive ones.. they are so easy to use.
ReplyDeletecee
EarlyStylePennyRugs
Hi Colleen ~ What wonderful tutorials. Thank you for all this great info.
ReplyDeleteThanks I really learned something:)
ReplyDeleteRondell
Thank you so much. I can hardly wait to try the freezer paper method!
ReplyDeleteSmiles,
Lea
Hi there. I love this entry. I bought a kit from you a while back. I posted this on one of my blogs...to remind me later...when I want to attempt to cut pennies. Thanks for the tutorial.
ReplyDeleteHi Thank you for all your tips.
ReplyDeleteI'm in Quebec and i want to know where i can find freezer paper.
If your grocery store doesn't have it in the aluminum foil and plastic bags section, try a butcher. Also check into quilting shops. Quilt shops carry a quilter's version of transfer paper that is more expensive. I can also ship you some pieces. Check my Etsy shop.
DeleteHello, I'm trying to self teach myself how to do a Penny Rug. I came across your site and it's full of information that is helping me.
ReplyDeleteI'm wondering about the freezer paper, do you iron the paper onto the felt or do you just let it lay on the felt without attaching it? I jus attempted my first penny and posted it on FB. But I made my template out of a pizza box and laid it on the felt and used an ink pen to trace around it. Is that ok or no? Plus is there a right side and wrong side to the felt, if so which is which?
Thanks again for your site as I stated earlier it's full of information.
Pam
Hi Pam,
Delete1)Yes, iron the freezer paper onto your wool or felt, shiny side down. You might be able to reuse it if you're careful.
2)There are no rules, pencil, chalk, graphite will work to mark the fabric. If you use pen, you will want to cut the ink away.
3)There is only a wrong side if you don't like it. Sometimes when we turn things over, or upside down, they look better.
I have never made a penny rug before or even worked with felt. I am really excited about getting started and the information found here was extremely helpful! Thanks bunches.
ReplyDeleteColleen do you sell the templates?
ReplyDeleteYes I sell templates! Check my Etsy shop, I will be shipping at the end of January. Click on the link in my Etsy shop for an email when I reopen my shop. The templates will be listed at that time. Thanks for asking!
DeleteAn answer to my prayers... 'make cutting pennys easier'. The tutorial is wonderful too.
ReplyDeleteThanks so much for sharing.
Peace,
Barb
Hi Barb, thanks for checking out my blog post. Happy Stitching!
Delete