I completed this mat in 2018
and posted it with a summary of my trip to France.
It deserves it's own space.
Happy Easter, Happy Spring!
 |
| A random layout of greens and reds (because I love red) |
 |
| I taped the rows and numbered them so I wouldn't forget my random layout. |
|
|
Which was a good thing considering how long this project waited for me.
 |
| Center row basted down. | |
| |  |
|
|
| | | | | | | | | | | | | | | | | | | | | | | | | | | | | | | | | | | | | | Tip; I remove some of the "stick" of the tape on my jeans before I put it on the wool. | | |
| | | | | | | | | | | | |
|
|
|
|
|
| | | | | | | | | | | |
|
|
|
|
|
|
|
|
|
|
|
|
|
|
| | | | | | | | | | | | | | | | | | | | | | | | | | |
| |
|
|
|
|
|
|
|
|
|
|
|
|
|
|
|
|
|
|
|
|
|
|
|
|
|
|
|
|
|
|
|
|
|
|
|
|
|
|
|
|
|
|
|
|
|
|
|
|
|
|
|
|
|
|
|
|
|
|
|
|
|
|
|
|
|
|
|
|
|
|
|
|
|
|
|
|
|
|
|
|
|
|
|
|
|
|
|
|
|
|
|
|
|
|
|
|
|
|
|
|
|
|
|
|
|
|
|
|
|
|
|
|
|
|
|
|
|
|
|
|
|
|
|
|
|
|
|
|
|
|
|
|
|
|
|
|
|
|
|
|
|
|
|
|
|
|
|
|
|
|
|
|
|
|
|
|
|
|
|
|
|
|
|
|
|
|
|
|
|
|
|
|
|
|
|
|
|
|
|
|
|
| | | | |
| | | | | | | | |  | Gathered all into one of my many cigar boxes, and there is sat and sat and sat. |
|
|
 |
Stitching again!
I am using an overdyed #10 crochet cotton with a #20 Chenille needle.
Both are my favourites. |
 |
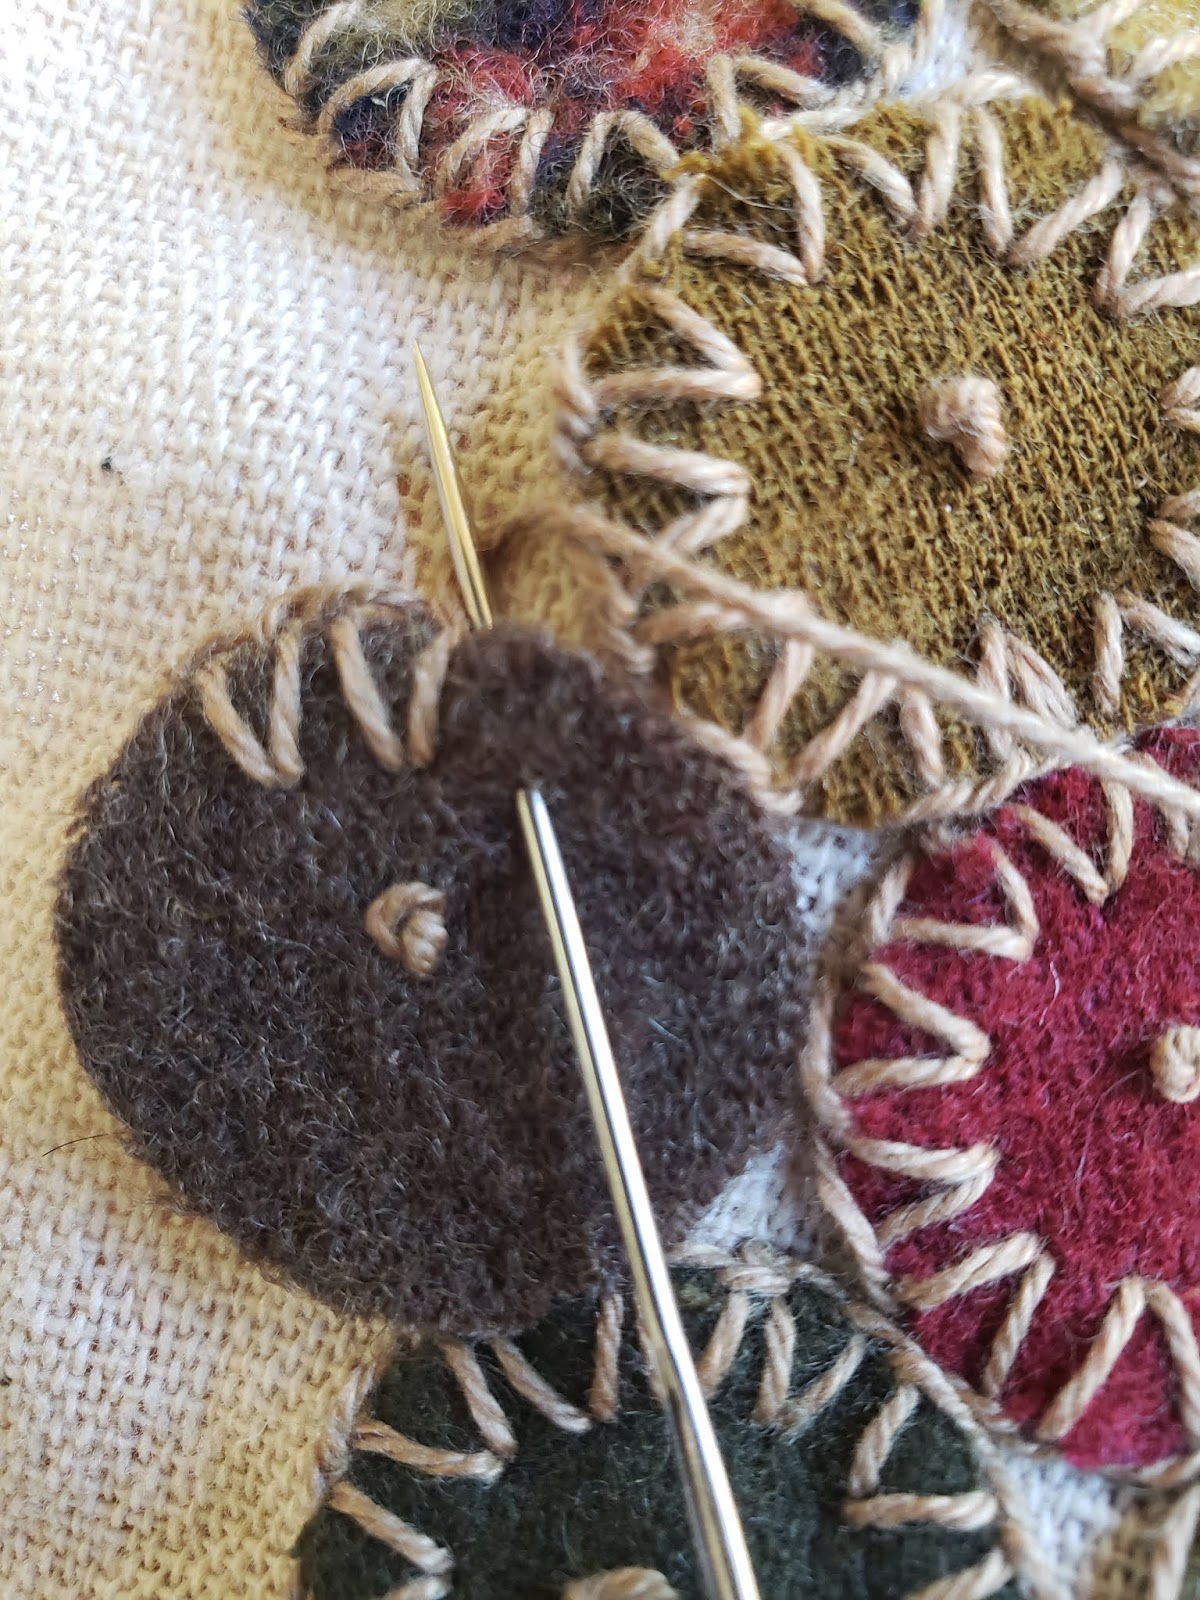
Hold the penny in place with a french knot.
Apropos, oui mais non? |
 |
| Bring your needle up from below |
 |
| Begin a slanted blanket stitch |
 |
Here is where you "close" the blanket stitch,
join the two bottoms of the stitch in the middle.
It looks rather lacey doesn't it? |
 |
| Do you see how it is simply an angled and closed blanket stitch? |
 |
| Doing it again |
 |
| And again |
 |
| End the circle with the needle into the first stitch. |
 |
| So
far so good, some pink and orange in there to keep it random. Make your
mat any size, you can add or subtract rows. It doesn't have to end in
points. Choose your own style. |
(No worries, I will show you how I line the back of this rug
and hide all those unsightly threads.)
Keep going, stitch down the rows that you neatly taped and set aside.
Tip; notice here that I placed a stitch holding row number 12 tape as a marker.
The marker is so that I would know which end is which, and which way is up.
You can be really random and just pick a penny from your stash,
just keep stitching them down.
 |
| DONE! |
 |
| Apply masking tape to all sides to create an even cutting edge. |
 |
| Trim away the excess using the tape as a guide. Gently remove the tape. |
 |
| Lay right side down onto a fabric for the backing. |
 |
| Trim away excess backing fabric, matching the size of penny mat. |
 |
| Pin well, allow an opening to turn to right side. |
 |
| Sew
all sides, not too close to the finished pennies. Pivot at corners and
remember to leave an opening on one side of about 3 - 4 inches for
turning. |
 |
| Here is my opening. |
 |
Trim the seams down to 1/2 or 1/4" and clip corners.
After you turn your mat inside out, be careful at the corners.
Use something blunt to push them out, GENTLY, don't push through the fabric.
Or you can pull them gently from the outside with a strong needle. |
 |
This is mine turned through the opening and pressed with a warm iron.
(Press on the backside, or cover the front with a pressing cloth) |
 |
| Sew the opening closed with a ladder or whip stitch. |
 |
| ENJOY! |
|
|
|
|
|
|
|
|
|
Yours, Colleen


Just a beautiful penny rug! Love this type of blanket stitch. Janice
ReplyDeleteAdorei sua técnica de trabalho .Parabens !
ReplyDelete