It always feels good to complete another rug.
This is a new style for me.
I used Cee Rafuse of Early Style Penny Rugs Marriage Rug Kit
(Thanks Cee!)
FYI, Cee is sold out of her kits, the good news is you can order my pattern, authorized by Cee,
in my Etsy Shop, the Marriage, Plaid, or Memory Rug, printed Pattern
FYI, Cee is sold out of her kits, the good news is you can order my pattern, authorized by Cee,
in my Etsy Shop, the Marriage, Plaid, or Memory Rug, printed Pattern
I used lightweight wool from two matching pleated skirts.
I cut my bias strips 1.5 inches wide,
I joined shorter strips as needed.
You can see the joining method here on my last tutorial.
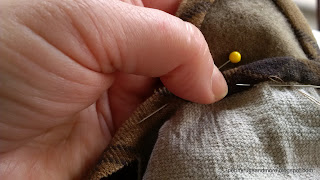
I sewed the bias strip directly to each tongue,
with a 1/4" seam, easing in the curves.
My new method for bias trim is
NOT to iron and fold.
I skipped the whole step.
This is the newest trick I learned from Cee,
for the ironing after sewing...
soak the tongue in water and then fold the trim.
Seriously!
Try it, you will be amazed. The bias trim folded into place.
No iron burned finger tips.
Although, lots of wet pieces of wool resting
overnight to dry.
overnight to dry.
Once dry, finish with a blind stitch
and press.
Layout out tissue template on a piece of fabric
that is larger than the length of the first row all the way around.
(I used Cee's template that came with her sold out kit)
(I used Cee's template that came with her sold out kit)
Being sure to have extra backing to trim away.
I widened my rug by one tongue width.
You'll notice my two tissue pieces do not butt together.
Lay your pieces out several times before doing this running stitch, through the tissue, onto your backing fabric.
Now the fun part, carefully peel off the tissue.
I saved mine for a future rug.
Then pin each row of tongues well.
I overlapped only on the curves.
This uses less tongues and is best for
this fabric trimmed version,
as the tongues can be bulky.
Lay all the overlaps in the same direction.
I alternated the tongues
so that no two of the same colour were side by side.
Row one, pin raw edges to outer running stitch:
Row two:
Row three:
Stand back and admire your placements.
Don't expect the tongues at the curves to curve.
They will be on an angle to your placement stitches.
Carefully make a running stitch,
holding each tongue in place.
Starting with the bigger outside row.
Okay, this is where I cheated on the hand stitching again.
I went straight to my Bernina.
The downside of machine stitching...
it was a lot of rug and bulk at my machine.
it was a lot of rug and bulk at my machine.
Rounding the curves I lost it a bit.
Don't look too closely, you'll see the curve wobble.
You can hide your stitches if you
choose to line your backing fabric.
This for me is a learning and teaching rug.
All my triumphs and mistakes are here to see.
If I am going to completely confess my goof ups....
I suppose, it's when you get excited to get things done and you forget to flip the right side of the tongues up.
I was contemplating colour and forgot
to look back at the upside or downside of each tongue.
I knew I was going to check,
it was in my thought process,
but completely forgot!
Oh well, only you and I know.
If it's important to you, check the upside
and downside of the tongue.
Trim the backing so that you have enough to stitch a seam and complete the backing with the edge finish
just at the curve on the tongues.
I've allowed 1/4" seam.
I machine sewed the bias trim directly to the rug backing.
(right sides together)
Hold the first row of tongues out of your way
as you stitch the bias trim around the backing.
No need to fold or press until it is sewn in place.
No I didn't soak this trim, I turned and ironed it over.
Carefully blind stitch to the underside of the rug backing.
Oh yes, almost forgot a final step!
The middle row was stitched in place by hand
and covers all the third row tongue raw edges.
Pin three tongues to the left of centre and three to the right.
(my rug needed three each way, you may only need two)
(my rug needed three each way, you may only need two)
Place the long double ended tongue along the centre of the rug.
This piece will finish the rug and hide the ends of the last two middle tongues, blind stitch it to the centre of the rug.
I also tacked several tongues down with a blind stitch,
especially the centre ones and
a few others that were showing a peek of the backing.
I didn't tack down all the tongues,
the binding gives them a good weight to lay nicely.
Do you prefer to call these tongues
or,
petals,
lamb ears,
pen wipers,


Well done. I admire your work and will tackle one of this someday.
ReplyDeleteThanks Rebecca, I like doing the binding,if you like machine work, it's easier sometimes than the blanket stitch.
ReplyDeletefabulous! a masterpiece..
ReplyDeleteThanks Z!
DeleteHello, thank you so much for sharing your process with us. Penny rugs are not very common where I live but I love wool. Must try at least a candle mat one day!
ReplyDeleteI am about to tackle my first primative rug. I will probably call them petals.
ReplyDelete