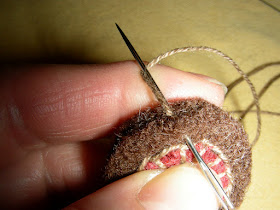
Here's how I do that first stitch. This is a two stack.
I'm attaching the backing penny.
I always wrap the needle just once.
The wrap allows that first stitch to stand at attention.
No slanty beginnings here.
 The second stitch
 Let's do that again, see below. Wrap your needle just once.
See how the stitch stands straight as you move to your next stitch.

Very nice.

I'm working on penny ring pin cushions today. And watching the new listings on Etsy. Have you ever done that, just let the new listings float by. Sometimes clicking on the items that look interesting. Rainy day fun.
Check my etsy shop for penny rug pin cushion rings!

Thanks for the great instructions! I'm looking forward to getting my templates. I bought a couple wool skirts at GW the other day. I have taken them apart and washed them per your directions. Now I am ready to cut!
ReplyDeleteThank you for that pictorial. I want to make penny rugs but couldn't get the stitches right.
ReplyDeleteWell, now I know. Thanks. :O)
ReplyDeleteWhen you have made all your penny stacks,how do you suggest they be connected to each other.
ReplyDeleteHi Colleen, since reading your blog I wished that I could have found you a few months ago while trying to figure out how to start that first stitch.
ReplyDeleteYou make it look SO easy.
I am well on my way stitching penny rugs but had to learn the hard way:( But thanks to you, you will make it so easy for the beginner:)
beverleejb
I'm still confused, do you go in between the pennies for the first stitch? Could you do a utube tutorial? Thanks!
ReplyDeleteYes, stitch between the pennies. Have a look at my youtube tutorials. Click on the link in the sidebar. Follow the 5 part tutorial for the yellow rug and look at the green rug tutorial.
Delete